I want to shell script my way to a better life with YouTube. To do this, I need a shell script which can make authenticated queries against the YouTube API. In the past I've done this by making use of the urn:ietf:wg:oauth:2.0:oob redirect_url. Google has since disabled this method, so now I need to update my shell script to make use of a real redirect_url.
Below are the steps I went through to accomplish this. If you find yourself in need of an oob redirect_url replacement, feel free to grab and use any of the code mentioned below.
Step 1. Install oauth2handler on a server for your choice. I've set it up on an EC2 nano instance over at https://code.benjisimon.com/oauth2handler.
Step 2. Set up a project over at the Google Developer's console. I had a project set up there already, but you can make a new one if you're starting from scratch.
Step 3. Turn on the relevant APIs for your project. I want my shell script to talk to YouTube, so I've enabled the YouTube API.
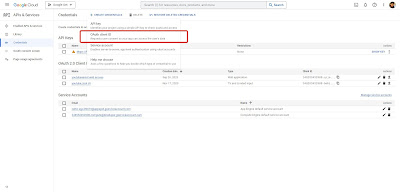
Step 4. Head over to the credentials section of the console and create a new set of OAuth client ID credentials.
Step 5. Properly configure your credentials. For Application Type, select Web Application, for Name enter the name of your choice. Now for the most delicate setting: adding the correct redirect URL.
If you're using my oauth2handler that URL will be:
https://domain-hosting-the-script/oauth2handler/<slug>
I'm hosting the oauth2handler over at https://code.benjisimon.com/oauth2handler, and I'm using the slug blog_sample, so my redirect URL is:
https://code.benjisimon.com/oath2handler/blog_sample
Once all the settings are in place, click Create.
Step 6. Download the JSON credential details.
Step 7. Copy the JSON credentials file onto the server hosting oauth2handler. The name of the file must match the slug that you entered in the redirect_url. oauth2handler expects to find JSON files here:
/var/www/private/oauth2handler
Continuing my example, I copied the JSON credentials file to:
/var/www/private/oauth2handler/blog_sample.json
$ cat /var/www/private/oauth2handler/blog_sample.json | jq .
{
  "web": {
    "client_id": "XXXXXXXXXX-idh870p1hr4udihsu9v4s13pc08mm9lo.apps.googleusercontent.com",
    "project_id": "XXXXXXX-XXXX-89019",
    "auth_uri": "https://accounts.google.com/o/oauth2/auth",
    "token_uri": "https://oauth2.googleapis.com/token",
    "auth_provider_x509_cert_url": "https://www.googleapis.com/oauth2/v1/certs",
    "client_secret": "XXXXX-XXXXXXXXXXXXXXXXXXXXXXXXXXXXXX",
    "redirect_uris": [
      "https://code.benjisimon.com/oath2handler/blog_sample"
    ]
  }
}
Step 8. Grab the gapi_auth shell script from Github and set it up to be executable from the command line. You can use gapi_auth and oauth2handler to authenticate any OAuth2 API, not just the YouTube API.
$ gapi_auth -h
Usage: gapi_auth -i CLIENT_ID -p CLIENT_SECRET -r REDIRECT_URI -s scope [-h] [-c context] {init|token}
Step 9. Initialize your shell script for execution by calling gapi_auth with the CLIENT_ID and CLIENT_SECRET mentioned in the JSON credentials file. Set the scopes per the API documentation. My youtubeassist shell script let's you initialize authentication by setting specific variables in ~/.config/youtubeassist/config. Alternatively, you can call gapi_auth directly.
# init with youtubeassist
$ cat ~/.config/youtubeassist/config

# Auth setting
CLIENT_ID=XXXXXXXXXX-idh870p1hr4udihsu9v4s13pc08mm9lo.apps.googleusercontent.com
CLIENT_SECRET=GXXXXX-XXXXXXXXXXXXXXXXXXXXXXXXXXXXXX
API_SCOPE="https://www.googleapis.com/auth/youtube"
AUTH_REDIRECT_URI=https://code.benjisimon.com/oauth2handler/youtubeassist
AUTH_TOKEN=`gapi_auth -i $CLIENT_ID -p $CLIENT_SECRET -s "$API_SCOPE" token`

$ youtubeassist -a init
...

# init directly with gapi_auth
$ gapi_auth -i XXXXXXXXXX-idh870p1hr4udihsu9v4s13pc08mm9lo.apps.googleusercontent.com \
            -p GXXXXX-XXXXXXXXXXXXXXXXXXXXXXXXXXXXXX \
            -r https://code.benjisimon.com/oauth2handler/blog_sample \
            -s https://www.googleapis.com/auth/youtube -c blog_sample init
Visit:
https://accounts.google.com/o/oauth2/auth?client_id= XXXXXXXXXX-idh870p1hr4udihsu9v4s13pc08mm9lo.apps.googleusercontent.com&redirect_uri=https://code.benjisimon.com/oauth2handler/blog_sample&scope=https://www.googleapis.com/auth/youtube&response_type=code&access_type=offline&approval_prompt=force
JSON doc?
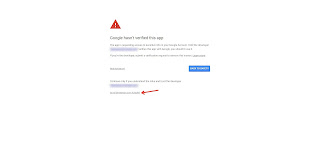
Step 10. Visit the URL offered by the command line and don't panic when Google gives you an error. In my case, I had a typo in my redirect URL. I fixed the typo in the Google Console, downloaded the credentials again and copied them over to the oauth2handler directory. Hopefully you won't mess up the redirect_url, but as my example shows, there's no harm if you do.
Step 11. Run gapi_auth init and visit the URL offered at the command line. Answer the prompts provided by Google. Paste the resulting JSON document back at the command line and hit Control + d to complete the script.
Step 12. You're done! youtubeassist will run gapi_auth token to get an authentication token whenever it needs one. You can also do this from the command line using gapi_auth directly.
$ token=$(gapi_auth -i XXXXX -p GXXXXX -s https://www.googleapis.com/auth/youtube -c blog_sample token)
$ echo $token
ya29.a0AfB_byBwZPgKpO9d8Whtkp2lZhjCmUF9uep8vqqepuca7SBd44gYoTSo_FzNZk48WxCndq450DcIYDVUVBN2l76cOZ8VNqTFurJmpg6jok5wN3FNHeNIG8AeGmMtoGr-ABtHA9RF1dtBmE1R9ofxIczYSFq_riVxhYw8aCgYKAWASARISFQGOcNnCU1gLb0amDlZ1Sutefe7GGg0171
$ curl 'https://youtube.googleapis.com/youtube/v3/channels?part=statistics&mine=true' \
     --header "Authorization: Bearer $token"  \
     --header 'Accept: application/json'
{
  "kind": "youtube#channelListResponse",
  "etag": "eOJPfNqYIr0W6hNUsh8QW8ETULU",
  "pageInfo": {
    "totalResults": 1,
    "resultsPerPage": 5
  },
  "items": [
    {
      "kind": "youtube#channel",
      "etag": "Gxyk-N0SnISUEq-DoTYlo1umrM0",
      "id": "UCCsd3dwyF1qnzzmk7vrRbbQ",
      "statistics": {
        "viewCount": "13152",
        "subscriberCount": "17",
        "hiddenSubscriberCount": false,
        "videoCount": "37"
      }
    }
  ]
}
The API request above shows that that I've got 37 videos uploaded to YouTube and 17 subscribers. Success! With the authentication complete, it's time to start hacking my way to a more efficient YouTube experience. Stay tuned!


.jpg)


