Friday, March 31, 2023

Passover Prep 2023 | New Questions, New Resources

It's Seder prep time, which means I've been re-reading the Haggdah. While I don't have a whole lot new answers, I've been lucky enough to find some new questions.

1. The Ha Lach Ma is a already a curious way to start the seder. For example: why call for people to join you at a meal once the meal has already begun? But this year I've got a new question: we are inviting all "who are hungry" to not just 'eat', but to eat "the bread of affiliation." What kind of offer is that?

2. The story of the Five Rabbis emphasizes that even the very wise should study Passover in detail. That's sensible. But if that's the purpose, why not use the story of the Rabbis recorded in Tosefta Pesachim 10:12 to show this? Why seemingly invent a similar story with a different cast of characters to show the same thing?

3. We've often wondered why the wise son can get away with using the phrase 'to you,' but when the wicked son uses similar phrasing he's scolded. This year I realized another puzzling nuance: the wicked son and one who can't ask at all get the same answer: Exodus 13:8. Why is that?

4. After enumerating the well known 10 plagues, we dive into a discussion of how many plagues occurred 'at the sea.' Surprisingly, we get a clear answer to this question in Perkei Avot 5:4: "Ten plagues did the Holy one, blessed be He, bring upon the Egyptians in Egypt and ten at the sea." Why did the Haggadah choose to leave out this simple explanation?

Here are some additional Passover resources I've been loving:

  • Both a modern interpretation from Haggdot.com and the 17th century commentator, Naftali Seva Ratzon note that the passage V'he Shemadah starts literally with: "And She" and have innovative commentaries based on this.
  • This is an impressive breakdown of the plague count using different biblical sources. Spoiler alert: no one source says there was 10 plagues.
  • I love this unexpected perspective on the 'Pour out thy wrath' section of the Seder. More than ever I see these verses a barometer for how accepted we feel as a people. When 'Pour out thy wrath' feels awkward, it means we're doing well; when it resonates we know just how insecure our times our.
  • In Megillat Esther, the décor at Achasverosh's feast includes the phrase: 'cotton [wall] hangings'. The Hebrew for this phrase uses the word 'Karpas.' And boom, just like that, you can now link Passover and Purim.
  • Here's a copy of the Haggadah with the relevant Talmud sources included inline. I love how this gives additional context to the Haggadah, showing purpose to many of the seemingly random things we do during the Seder.
  • This "Feminist Supplement to the Haggadah" may have a seemingly provocative name, but the content is both well thoughtful and powerfully written. Check it out, I think it would be a beautiful addition to any Seder.
  • Hallel, which we recite at the end of the Seder, is made up of psalms 113 to 118. This fact is obscured by the way the text is paginated. By splitting up the paragraphs just so, we can emphasize different parts of the text and give a unique feel to the experience of reciting these six psalms. How and when was this pagination developed? I've Googled but couldn't find an explanation. I asked Chat GPT and it immediately gave a plausible answer. When I try to confirm the facts Chat GPT provided by additional Google Searches I still come up empty. Thus I find myself with yet another new question this year: Should I trust Chat GPT?

Wednesday, March 29, 2023

This Bud's For You

Running along the Mount Vernon Trail this past weekend it was impossible to not stop and take pictures of the budding and flowering trees. Just because this happens every year, and "that's how trees and plants work," doesn't mean it's not amazing spectacle to behold!

Bring on the seasonal alergies!

Friday, March 24, 2023

Attempt #1: How Not To Measure an Audio Amplifier's Gain

I want to measure the gain of the audio amplifier that powers my  Elenco AM/FM Radio Kit build. The instruction manual gives straightforward directions for doing this. Unfortunately, I don't own an audio generator, which the instructions call for, so I can't follow them.

However, I figured could McGyver my way through this process by using tools I have on hand. Gain is the output voltage of the audio amplifier divided by the input voltage. I'm thinking this is simple: I'll feed in an audio signal from my cell phone into the radio and then use my multimeter to measure the input and output voltage. A bit of basic arithmetic would then tell me what the gain was. Easy peasy.

Wrong Way #1

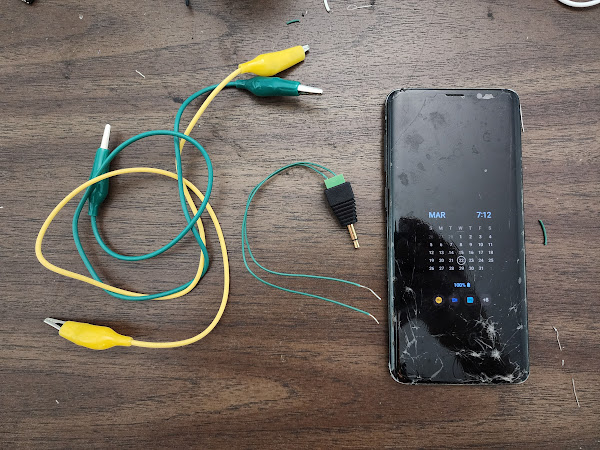
To feed in an input signal, I downloaded the Frequency Generator App, and used the setup described previously to connect my phone to the radio.

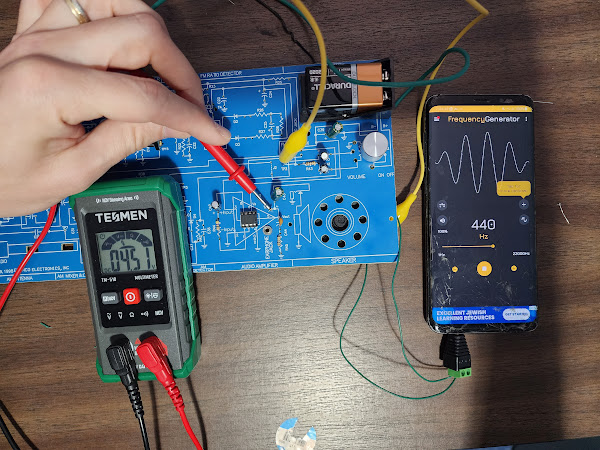
Next, I measured the output voltage:

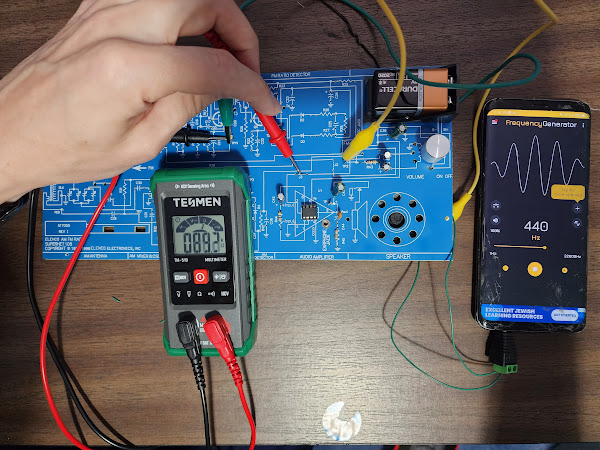
The meter read: 4.51 volts. Fair enough. Now's it was time to measure the input voltage:

And my meter told me: 89.2kΩ. Wait, what? I'm no electronics expert but even I know that's not right. What the heck?

It took me a few days to figure out what's going on here, but in hindsight, it's obvious. At the start of this project I picked up a TESMEN TM-510 multimeter. I knew I'd need a meter and figured a basic one would do the trick. It was cheap, compact and even automatically selected the measuring mode so I couldn't screw that up. I figured any low cost multimeter would get the job done. Apparently, I was wrong.

The meter's automatic mode selection must work by first looking for a voltage. If one is found, then it must guess that I want to measure voltage. If no voltage is detected, then it must mean that I want to measure resistance.

In this case, when I try to measure the input voltage, the meter must not be detecting enough voltage to convince it to properly measure the right value. Therefore, it falls back to resistance and tells me some nonsense value. Looking at the specs of the meter I see it has a minimum voltage of 0.8 volts. If my output voltage is 4.5 volts, and the gain of the amplifier is 150, then the input voltage should be around 0.03. That's way below the minimum voltage this meter can detect.

It never occurred to me to consider this bit of fine print. I'm not sure what role this meter is optimized for, but it's probably not designed for hobby electronics where one may deal with small voltages. That's my guess anyway.

I've since ordered a KAIWEETS HT118A, which is also relatively low costs, and generally receives a good bit of praise on YouTube. This is probably the meter I should have bought in the first place.

The mystery of my audio amplifier's gain is going to have to wait for another day. But the lesson on respecting fine print has been learned today.

Wednesday, March 22, 2023

But Does It Amplify Audio?

I've finished building the first stage of my Elenco AM/FM radio kit, which is an audio amplifier. The build instructions now recommend a series of tests using a multi-meter, audio generator and oscilloscope. While I'm all for doing these formal tests, I couldn't help but take a detour and try my own more casual experiment.

Here's my thinking: if I've built an audio amplifier, doesn't that mean it should amplify audio? That is, if it I take an audio signal from my cellphone's headphone jack, shouldn't I be able to hear it over the speaker? I really wanted to find out.

I picked up a set of these audio jack adapters that allow you to connect arbitrary wires to any 3.5mm headphone jack. Using a bit of hookup wire and some alligator clips, I connected one lead of the headphone cable to ground , and the other lead to the audio amplifier's input.

On my cell phone, I switched over to YouTube and hit play on a video. I then cautiously turned on the radio, increasing the volume every so slightly. And....

Success! I could hear the cellphone's video playing through the radio's audio amplifier. Whoo! I'm #1, I'm #1!

To anyone with even a bit of electronics experience, I'm sure you're shaking you're head. I'm using an audio amplifier to amplify audio; of course it works. And technically, I didn't even build the audio amplifier. All I did was wire in an audio amplifier chip (an LM386N) to a speaker with a few resistors and capacitors to help it out.  But still, to have my mental model match up to hardware I've personally built was quite a rush!

Next up: I'll get a bit more technical and the measure gain of the amplifier I've built. This is fun!

Monday, March 20, 2023

Lessons from the Electronics Bench: Trust Nothing.

I've finished building the first stage of my Elenco AM/FM radio kit. One of the key features of the Eleneco kit is that it comes with instructions for testing each module that you've built. This helps ensure you don't get too far along in the build process before discovering issues. More importantly, it helps ensure that you understand what you're actually building, which for me is what this exercise is all about.

One of the first tests I was supposed to run was the 'Output Bias Test.' Basically, you pop in the battery and turn the radio on. You then check the voltage coming out of the audio amplifier I just built.

Even as a electronics novice I could appreciate that this test was confirming that at least power was flowing through the radio.

I grabbed a random 9 volt battery from our battery pile. I plugged it in. I turned on the radio and used my volt meter to test the output. Nothing.

I didn't panic.

I looked over the circuit and realized I'd never installed the IC amplifier into the IC socket. I did this and repeated the test. Still nothing.

I looked over the circuit, all seemed fine. Then it hit me: I bet this random battery is dead. I poked around and found a sealed package of Duracell, 9 volt batteries. Now we were talking. I popped one of those into the radio.

Nothing. The volt meter still read 0.

Hmmmm.

If this were a software problem I'd debug it by picking something that I knew was true and confirming that it was so. I knew very little about the circuit I'd just soldered together, but I did know that a 9 volt battery should be spewing out 9 volts. So I tested the batteries.

The first, sketchy battery, was indeed dead. It read 1 volt when I measured it with my volt meter. To my surprise, the second battery wasn't much better: it was brand new, but read only 4 volts.

I grabbed another from the package and tested it: 8.8 volts. That seemed better. I put that battery in the radio and turned it on. A got a hum from the speaker! And check it out, here's my volt reading from the audio amplifier's output:

The manual says that my meter should read between 3 and 6 volts. My meter read 4.34. Success!

Lesson learned: Trust Nothing.

Before you boycott Duracell, take a closer look at the above pic. The expiration date of my new-in-box battery was 2020. Yikes, those are ancient. No wonder the first was a dud. Onward!

Friday, March 17, 2023

Who Needs Cherry Blossoms? Some Love for Flowering Magnolias

Around here, Cherry Blossoms tend to get all "Spring is here, look at these gorgeous blooming trees!" love. But for me, it's the flowering magnolias that steal the show.

Magnolias evolved so long ago, they predate bees as pollinators. Instead, beetles do the job. And because they were around in the Cretaceous Period, T-rex's would also have enjoyed their beauty. Rwaaaar!

The purple flowered magnolias are Magnolia liliiflori. liliiflora mean 'flowers like a lilly' and explains their common name of 'Lily Magnolia.' The white flowering magnolia is an example of Magnolia stellata,or 'Star Magnolia.'

These magnolias are especially dramatic because their flowers bloom before they have leaves. This is known as precocious flowering and is no doubt a technique the magnolias use to attract pollinators. It certainly attracts my camera.

A popular set of magnolia cultivars (crosses from different types of mangolias) are known as the girls. These 9 varieties were created just a few miles from where these photos were taken, at the National Arboretum in the 1950's. A keen eyed observer may be able to tell you one magnolia is an 'Ann' while another is a 'Ricki.' The names come from the daughters and wives of various employees at the arboretum. How 1950's.

Tuesday, March 14, 2023

An Axestastic Good Time

This past weekend we went axe throwing at DC's Kick Axe and it was *awesome*. This was a new experience for the four of us, and everyone had an excellent time.

Axe throwing is exactly what it sounds like: you rent a lane and for an hour and hurl axes at a wooden target. I'm sure my country brethren are laughing their butts off at the idea of paying premium prices for the privilege of throwing a common tool at a piece of plywood. Heck, I'm wondering if I couldn't set up my own axe throwing lane in my back yard. But regardless, it was a blast.

Axe throwing requires enough skill and luck, that it's not trivial to master, so nobody got tired of trying. At the same time, it's low skilled enough that we could all have moments of glory doing it, and it doesn't require a ton of concentration.

Kick Axe itself was non-smoking, clean and had a low enough noise level that it was easy to carry on a conversation. The food was OK, with the tacos and macaroni and cheese bites serving as stand outs. The chips and salsa and pretzel (that came without mustard or a dipping sauce) were passable. The only issue was our server came by once to ask us for an order and once to deliver the food. After that, we never saw him again. We couldn't even find him to pay for our food (we flagged down another server to pay). So yeah, the service that night wasn't great. But we weren't there to eat and drink: we were there to throw axes and that we did!

We split into teams and played to 21, following the rule that if you go over 21 you reset back to 15. Hitting precisely 21 is trickier than it sounds. Everyone except myself managed to land at least one bullseye; Shira had an impressive double-bullseye as the night wrapped up.

All in all, a great time and I'd go back in a heartbeat!

Wednesday, March 08, 2023

I'm Glad I Soldered This Backwards. Really.

I've started building my Elenco AM/FM Radio Kit and breathed a sign of relief when I finished soldering the audio amplifier's IC socket. The socket's polarity and eight legs were opportunities to mess up the trickiest component I'd worked with yet.

Noooooooooooo

When I went to solder the capacitor between pins 2 and 6, to my horror, I realized I'd soldered the socket on backwards:

What the heck? It took a few minutes, but I figured out where I went wrong: I'd carefully oriented the socket and flipped the board over to solder it into place. Gravity did its thing and the socket fell out. I put the socket back soldered it, all without considering its orientation.

At the time I was really ticked. I realized I better deploy some countermeasures before I started fuming and did something I'd regret.

First off, I put the project down and called it a day. While I wanted to fix this NOW, I realized that taking a beat would be much smarter.

The next day, I Gratitude Gamed this failure.

Let's Gratitude Game This

The Gratitude Game is a technique I use for dealing with mistakes. It has two parts. First, without judgment or filtering I enumerate all feelings related to the debacle. The nastier and more irrational, the better:

  • Of course you screwed this, up you always screwup projects like this.
  • You've broken the project. It's done.
  • I bet if you try to fix this, you'll only make this worse.
  • You should chuck this all in the trash and pretend it never happened.
  • You're an idiot and a loser.

Inner voices can be real jerks.

Next, I posed the question: how was this blunder a good thing?

  • If the goal of this project is to learn things, then this is an excellent opportunity to learn to desolder. That's a useful skill.
  • I need to stop thinking of hardware projects as an exercise in perfection. Screwing up and recovering is a basic skill I need to embrace and master.
  • I messed up the trickiest component yet, and the project isn't over. Despite what my inner voice claims, I haven't failed.
  • I can use this as a great example to talk about Gratitude Gaming on the blog.
  • I'm a beginner at this, of course I'm going to make mistakes. Who cares?

As is often the case, this exercise exposed my negative inner voice as a fraud and that far from my mistake being catastrophic, it was actually a good thing.

Let's Fix This

Using desoldering wick, it took just a couple of minutes to get the socket removed from the board.

I reoriented the socket and used a bit of masking tape to fight off the effects of gravity:

Within no time I had the socket soldered correctly. Far from being a crisis, my mistake had let me work on an important skill and set the tone for this project as being far more forgiving of errors than I imagined.

Monday, March 06, 2023

Warming Up My Soldering Skills: Building Hue

To understand the electronics behind radio, I need to build a radio. But before I can build a radio, I need to have basic soldering skills. So, to that end, I picked up Hue, a small 'learn to solder' project that would let work on these skills.

Before Hue arrived, I hit YouTube to watch a number soldering tutorials. Here are some of my favorites:

The last video is a handy source for cheap, yet still recommended, electronics tools.

Surprisingly, my favorite 'learn to solder' video is this one. I say surprisingly because the purpose of this video isn't to teach technique. What I found impressive was just how casually the author of the video solders 40 header pins to his Raspberry Pi Pico. I assumed 40 nearly-touching pins would have required brain-surgery level detail and accuracy. Not so. The author makes the process look simple: heat up the pad and pin, touch with solder, and go on to the next one. It's this simplicity-first approach that's on display in the video and I realized is what I should be striving for.

When my Hue arrived, I was ready to put my newly acquired knowledge and mindset to work. I warmed up my soldering iron and put the first resistor in place on the board. I touched the tip of the iron to the leg of the resistor and the pad. After a few seconds I touched the solder to another part of the pad. And...nothing. The solder would not melt. I fiddled with different combinations, but I couldn't get the solder to flow like all the demos I'd seen. Ugh.

Not exactly sure what to try next, I ordered some lead based solder off of Amazon. That seemed to help significantly and I was able to proceed with building Hue.

Ultimately, I managed to assemble Hue a minimal of drama. I even managed to seat the LED properly, so I didn't find myself reversing the one component that needed to be placed a particular way.

When Hue was assembled I slid the battery into place and turned it on. Nothing. As I slid the battery mostly out of the slot, Hue lit up. Apparently my soldering was fine, it's just that the battery wasn't making quality contact with the board itself.

Building Hue was a gratifying experience. The small board and close together contacts made for a nice beginner challenge. Having only 9 components, one of which had polarity, also fit with the beginner theme. I could see using Hue as a nightlight when we travel, which means that Hue may very well have a life beyond this learning exercise.

I don't love that the battery holder design seems too fragile. And more than that, I wish there were an explanation about what each of the electronic components do and why they were selected. Writing up these details would add almost no cost to the project and would dramatically increase its value.

The real question is: am I ready to tackle my radio project? If anything, Hue has shown me just how far I have to go before I'll be comfortable with a soldering iron. Still, it also showed me that this isn't rocket surgery and I can muddle through. Enough prep, let's build a radio!

Wednesday, March 01, 2023

Finding a Needle in a Map Stack | Using a Field Expedient Local Map Repository

Suppose I'm standing at a trail head in Shenandoah, National Park, and in my haste I forgot to download maps for our hike and have no cell signal. My options seem limited: wing it and do the hike without a map; or abort. Neither option is great. Fortunately, I've got an SD card in my bag with thousands of local USGS maps stored at the ready. So all is not lost.

Using either my phone's GPS Test app or my watch's navigation app, I determine my latitude and longitude. Thankfully GPS doesn't depend on cell phone signal, so chances are good I'll have access to it.

For this example I'm using the coordinates 38.380411, -78.516653. I grabbed these from a Google Map.

Next up, I open a Termux session on my phone and use the usgsassist script to wade through the 3000+ local maps to find the 9 I'm interested in. That is, the quadrangle that contains my current lat and long, and the 8 surrounding quadrangles.

$ usgsassist -a contains -f ../PA_VA/area.maps -l 38.3804,-78.5166 > area.maps
$ usgsassist -a neighbors -f ../PA_VA/area.maps -l 38.3804,-78.5166 >> area.maps
$ cat area.maps
Elkton East, VA|2022-09-28|https://prd-tnm.s3.amazonaws.com/StagedProducts/Maps/USTopo/PDF/VA/VA_Elkton_East_20220928_TM_geo.pdf|-78.625|38.375|-78.5|38.5
Tenth Legion, VA|2022-09-21|https://prd-tnm.s3.amazonaws.com/StagedProducts/Maps/USTopo/PDF/VA/VA_Tenth_Legion_20220921_TM_geo.pdf|-78.75|38.5|-78.625|38.625
Stanley, VA|2022-09-15|https://prd-tnm.s3.amazonaws.com/StagedProducts/Maps/USTopo/PDF/VA/VA_Stanley_20220915_TM_geo.pdf|-78.625|38.5|-78.5|38.625
Big Meadows, VA|2022-09-21|https://prd-tnm.s3.amazonaws.com/StagedProducts/Maps/USTopo/PDF/VA/VA_Big_Meadows_20220921_TM_geo.pdf|-78.5|38.5|-78.375|38.625
Elkton West, VA|2022-09-28|https://prd-tnm.s3.amazonaws.com/StagedProducts/Maps/USTopo/PDF/VA/VA_Elkton_West_20220928_TM_geo.pdf|-78.75|38.375|-78.625|38.5
Fletcher, VA|2022-09-21|https://prd-tnm.s3.amazonaws.com/StagedProducts/Maps/USTopo/PDF/VA/VA_Fletcher_20220921_TM_geo.pdf|-78.5|38.375|-78.375|38.5
McGaheysville, VA|2022-09-15|https://prd-tnm.s3.amazonaws.com/StagedProducts/Maps/USTopo/PDF/VA/VA_McGaheysville_20220915_TM_geo.pdf|-78.75|38.25|-78.625|38.375
Swift Run Gap, VA|2022-09-21|https://prd-tnm.s3.amazonaws.com/StagedProducts/Maps/USTopo/PDF/VA/VA_Swift_Run_Gap_20220921_TM_geo.pdf|-78.625|38.25|-78.5|38.375
Stanardsville, VA|2022-09-21|https://prd-tnm.s3.amazonaws.com/StagedProducts/Maps/USTopo/PDF/VA/VA_Stanardsville_20220921_TM_geo.pdf|-78.5|38.25|-78.375|38.375

I grab these maps from their SD card storage using fsops.

$ (cut -d'|' -f3 area.maps | while read url ; do basename $url ; done) > area.files
$ cat area.files
VA_Elkton_East_20220928_TM_geo.pdf
VA_Tenth_Legion_20220921_TM_geo.pdf
VA_Stanley_20220915_TM_geo.pdf
VA_Big_Meadows_20220921_TM_geo.pdf
VA_Elkton_West_20220928_TM_geo.pdf
VA_Fletcher_20220921_TM_geo.pdf
VA_McGaheysville_20220915_TM_geo.pdf
VA_Swift_Run_Gap_20220921_TM_geo.pdf
VA_Stanardsville_20220921_TM_geo.pdf                                                                                                                        $
$ mkdir pdfs
$ for f in $(cat area.files) ; \
   do \
     fsops cp /mnt/media_rw/3A13-C9A7/PA_VA/$f /sdcard/Maps/Trailhead/pdfs/ ; \
   done

Finally, I load the 9 maps of interest into an Avenza Maps Collection:

With the maps loaded, the hike is a go. Onward!