Thursday, January 28, 2021

A Stack Based Digital Photo Frame - Part 1

The Idea

I wanted to put some old monitors I had lying around to use. As I contemplated how I could turn them into a sort of digital whiteboard / pinboard, a solution begin to emerge. I could snap pics with my phone, click a button and bam! the photos would appear on the monitor.

So yeah, I just revinented the digital photo frame. While the idea wasn't unique, that didn't make it any less worthy of building. In the spirit of digital recycling, I decided to power my frame with an old Raspberry Pi I had lying around.

To dress things up further, my plan is to setup the frame to be stack based. New images will be pushed on the stack, and I'll support a 'pop' command that will reveal older images. Depending on how this works, I may add other stack operations like swap and roll.

The Plan

Step one of my plan was relatively simple: I'd install fresh software on the Pi and confirm that I can programatically display images on the monitor. Once that's accounted for, I'll figure out how to beam images to the Pi from my phone.

On paper, step one should be easy. And yet, as I thought about, all I could see were hurdles.

Here's how I anticipated it all going down: I'd try to download the latest version of the Pi OS, only to get stuck figuring out which version of the Pi I owed. And when I did finally download the right OS, there was no way I was going to be able to burn it to a Micro SD card from my Chromebook. Surely, I'd have to switch to a Mac or Windows box and download special software to do this. And when I did finally try to boot up the Pi, I was sure it would glitch out on the an ancient monitor. Like I said, all I could see were ways this could fail.

The Execution

So you can imagine how elated I was when every prediction of mine was wrong.

The good people at Raspberry Pi make it so that their OS is compatible with all versions of their hardware. From a fancy new Pi to the ancient one I have, the OS Just Works.

On to top of that, they provide instructions for installing from a Chromebook which worked flawlessly. I had no idea that Chrome OS would give me a way to burn images to an SD card, but they do.

I slid the micro sd card containing the OS image into the Pi, connected the Pi via HDMI cable to a clunky adapter on the back of the monitor and then plugged in the power cable. A few moments later, the Pi booted up and I found myself at GUI setup screen. I provided my Wifi settings, told the Pi I wanted to run in console mode and rebooted. I then found myself at a bash prompt.

I couldn't believe how smoothly this all had gone. I installed fbi using the command:

  sudo apt install -y fbi

And then finally, put the setup to the test by grabbing a JPEG off of one of my servers and attempted to display it:

wget -O us.jpg http://code.benjisimon.com/us.jpg
fbi -a us.jpg

To my complete shock and amazement, the image rendered on the screen. I had the foundation for the photo frame done without a single hiccup. (And with that statement, I've successfully cursed part 2 of this project).

Up next, I need to figure out how I'm going to deliver images from my Android Phone to the Pi. Still, I couldn't be more amazed at the work the Raspberry Pi foundation has done. Outstanding.

Monday, January 25, 2021

Review: Annihilation - Book 1

I finished listening to Jeff VanderMeer's Annihilation: Book 1 of the Southern Reach Trilogy and I'm so confused. I didn't start that way. The book sucked me in with a Sci-Fi expedition vibe, but by the end I was lost. I see now that the book is part of a series and was turned into a film. Hopefully book two will shed some light on what the heck I just listened to.

In the spirit of the main character of the book, I'm going to record some observations I made during my reading. When I do finally get around to Googling the book, I'll be curious to see how off I was in my hypothesis.

Spoilers Below

The book definitely brings the biblical symbolism. Area X has many of the properties you'd expect from the Garden of Eden. Multiple eco-systems are smooshed together and the boundaries of the space don't behave like physical dimensions.

When the biologist ingests the 'fruit' of the spores, like Eve, she doesn't die but has the vale of her surroundings lifted.

The words written on the wall have a biblical feel to them. The encounter with tower monster recalls the struggle prophets have had as they try to describe an encounter with the divine.

Yet the biologist is having none of this. She comes to Area X armed with a unique perspective. She's used to observing ecosystems from a safe distance, understanding that within an ecosystem chaos may may reign, while a broader view shows a different story. Her description of encountering a 'Destroy of Worlds' starfish encapsulates this well. The night may be calm and beautiful to her, but in the tide pool shared by the starfish, the world is collapsing.

The biologist manages to muster this perspective as she finds herself face to face with her own 'Destroyer of Worlds.' If you drop a philosopher in to Area X, you'd no doubt end up with a religious text. But because of the biologist's discipline, we're left with a series of observations that eschew the supernatural and focus on the facts.

Consider how she looks past the words written on the wall, uninterested in considering their meaning and possible implication as a divine message, and focuses on the biology that makes them possible. That would be like Moses ignoring the text of the Ten Commandments, instead focusing on the mechanism that etched letters into stone.

Philosophical ramblings aside, none of this actually explains what the heck is going on in Area X. Are things what they seem? Is this an alien life form that the government sends expeditions to explore; and does so cautiously because they are so over-matched by the creatures that inhabit Area X?

Surely there's more to it than that.

We know that far more expeditions have operated in Area X than the biologist was told. Are they perhaps in some sort of time loop, repeatedly exploring the same area? This may explain why new technology isn't added to the expeditions; it's the same set of expeditions over and over again.

And the biologist's husband refers to an area within Area X as the Southern Reach. Yet, the explorers are exploring on behalf of the Southern Reach. Is that a critical clue? Is all of the world engulfed by Area X and citizens don't know this yet. Or, is the name simply a coincidence.

Heck, is there even enough information in the text of book one to untangle Area X?

It's tempting to Google this all and find out what the Internet has to say. May plan is to stick with my information embargo until I get through the series. For now, I'm enjoying letting the mystery marinate.

Thursday, January 21, 2021

Hiking the Columbia Air Center Loop

While looking for family friendly local hikes, I came across the verbosely named Columbia Air Center Loop Hike through Patuxent River Park. It checked a number of key boxes: it's close by (only 45 minutes!), is a kid friendly distance (just 4 short miles!) and it's a loop. But what made this hike a must-do for me was the history of the location. 'Columbia Air Center' refers to the name of the air field that was operating on the grounds of the hike in the 1940's. It served the area's African American pilots because other air fields were whites-only. This article explains how the air field got its start:

The [African-American] pilots, members of a local aviation organization called the Cloud Club, had recently been kicked off a white-controlled airport in Virginia, so in 1941 they began leasing for $50 a month the 450-acre lot along the Patuxent River. Historical records show that it was among the first black-operated airports in the nation.

I kept an eye on the weather, and anytime there was even a chance of making this hike work, I nagged Shira to go for it. I finally wore her down this past weekend. The weather was iffy at best, and we had our friend's one year old with us. But months of nagging had left Shira's defenses reduced.

We pulled into the parking area for the trail and I quickly went off to snap photos. There's not a whole lot of evidence of the former Air Center's glory. There are historic plaques, a compass rose on the ground and a flag pole flying a CAC windsock. Still, the history is real here and I was glad to be among it. There was also a kids play area off in the woods and signs referring to camp sites and other amenities in the area.

As I mentioned, we had R., our friend's one year old along for the adventure. Shira declared that she was going to carry him for the hike. At about 29 lbs, R. is a whole lot of one year old so this was a bold promise. Shira, in full beast mode, didn't waiver and carried him the entire hike.

The hike's route is a shaped like a figure 8. Shira had us hike it in reverse which insured we got the lengthy road walk out of the way. The second loop of the hike was nearly all in the woods. I recommend doing the route in this direction.

R. started off annoyed that he'd been woken from the nap he'd started on the drive to the trailhead. Combined with the blustery weather, and one could understand why he was not the happiest camper. After completing the road walk and hiking in the proper forest, he finally started to the warm to the idea of being in the wilderness. His attention was ultimately captured by the trees and other sights of nature around us and he began to genuinely enjoy himself.

There's a waypoint on the hike marking the wreckage of a Piper J-3 Cub. When we arrived at this location I searched but wasn't able to find any evidence of the plane. I gave up, but was rewarded further up the trail with some ancient wreckage. I snapped some photos, and from looking at the distinct triangular shape of the front of frame, it does look like I found the J-3 cub. So if you do the hike and don't see the wreckage where the waypoint says it should be, don't give up.

Oh, and another pro tip: there's a detour on the red trail around some mud. I insisted to Shira that we folllow the GPX track and not the red arrow and found ourselves ankle deep in said mud. I thought it was actually the most interesting part of the hike, but then again, your definition of 'interesting' may be different than mine. Best to follow the detour and not to obsess about following the GPX track.

Overall, this hike was a pleasant one, though I'm not in a hurry to return to the park. The history of the area is impressive, though, there's minimal evidence of the air field and I could have done without the lengthy road-walk. Still, a walk in the woods with family and friends is always going to beat being indoors. If you find yourself near the park, you should absolutely stop by revel in the soul of the place.

Monday, January 18, 2021

Tasker and Google Sheets: Back On Speaking Terms

Combining Tasker and Google Sheets has on more than one occasion been a massive win. Recently the Tasker Spreadsheet Plugin stopped working and my attempt at using AutoWeb to access the Google Sheets API was a bust (I kept getting this exception). This left me with Plan C: use Tasker's built-in HTTP Actions to roll my own add-to-Google Sheets Task.

I braced myself for the hassle of implementing OAuth 2 using native Tasker actions. And then I learned about HTTP Auth and realized the heavy lifting was done. Building on the progress I made during my AutoWeb attempt, I was able to get my Task working almost too easily. I give you the: GSheet Append Row Task, a generic task that makes adding a row to a spreadsheet, dare I say, simple. Here's how you can use it.

Step 1. Setup

Import the GSheet Append Row Task into your Tasker.

Now comes the annoying part: you need to create a Google Cloud Project and OAuth 2 credentials in the Google Developer's Console. You can follow Step 1 from this tutorial to do this.

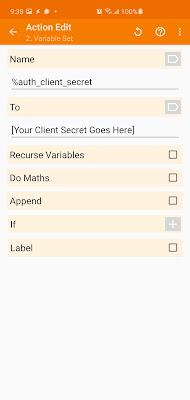
Ultimately, you're looking for two values: a Client ID and Client Secret. Once you have these values, edit the GSheet Append Row Task, and update the appropriate Set Variable actions at the top.

Once those settings are in place, you can close GSheet Append Row; if all goes well you won't need to edit it again.

Step 2. Call GSheet Append Row

You need to call GSheet Append Row with %par1 set to JSON with the following shape:

{
  ssid: '[spreadsheet ID - find this in the URL of the spreadsheet]',
  sheet: '[the name of the sheet you wish to append to]',
  row: [
    '[column 1 data]',
    '[column 2 data]',
    ...
  ]
}

You can prepare this JSON using the strategy outlined here. Though, I prefer to use a JavaScriplet:

  //
  // the actions before this set:
  //  %ssid to the the spreadsheet ID
  //  %now to %DATE
  //  %url to the URL to learn more
  //  %description to the description of the entry
  //
  // I'm looking to add a row with the format:
  //  date | description | url
  //
  // Note: date is being changed from m-d-y to m/d/Y
  //
  var args = JSON.stringify({
   ssid: ssid,
   sheet: "From the Web",
   row: [
     now.replace(/[-]/g, "/"),
     description,
     url 
   ]
  });

  // %args is now ready to be passed as %par1.

Once %args has been prepared, it's trivial to invoke PerformTask, setting the task to GSheet Append Row and %args as %par1.

Here's a Sample Task to see this in action:

Step 3.

Celebrate! If all went well, the first time you run GSheet Append Row it will ask you for permission to run. See this tutorial for details about this first interaction. Once permissions has been provided, appending rows should Just Work.

In Conclusion

This turned out to be quite a bit easier than I imagined it (thanks João, you rock!). Though, I don't love the fact that HTTP Auth depends on João's auth.html. I'm tempted to make my own version of 'HTTP Auth' that works locally and doesn't require a 3rd party server. Still, for now I'm just happy to to back to writing Tasks that integrate with Google Sheets.

Friday, January 15, 2021

PowerShell For the Win: Short and Sweet Edition

I just wrote this long and winding tale about how Windows PowerShell exceeded my expecations. Consider this post a sort of TL;DR for that monster.

I found myself needing to scale an image. On Linux and MacOS, I'd use the command line friendly ImageMagick. On Windows, I'd turn to Gimp. But I've got a shiny new tool in PowerShell, so I was curious if it could provide a Windows friendly command line solution. It does!

Step 1: I downloaded the Resize-Image Module from Microsoft's Technet Gallery.

Step 2: I launched PowerShell and typed:

## OK, let's do this...

PS C:\Users\benji\Downloads> Import-Module .\Resize-Image.psm1

# Wait, that worked? Oooh, cool! A quick look at the docs says that I
# can use -Display to preview image. Let me try that.

PS C:\Users\benji\Downloads> Resize-Image -InputFile .\icon.png -Height 200 -Display
Cancel

## The image was displayed, but smooshed

PS C:\Users\benji\Downloads> Resize-Image -InputFile .\icon.png -Height 200 -Width 200 -Display
Cancel

## The image is displayed and looks good. Let's make this official.

PS C:\Users\benji\Downloads> Resize-Image -InputFile .\icon.png -Height 200 -Width 200 -OutputFile icon.200x200.png

## That's it? No errors. No verbose out. I love it.

One gotcha: the OutputFile was stored in my hme directory, not the same directory as icon.png.

Step 3: I wrote this post.

I'm telling you, if you're a command line user and find yourself on Windows, PowerShell is your friend.

Thursday, January 14, 2021

Review: Artificial Condition: Murderbot Diaries

Move over Reacher, Rapp, and Bond there's a new action hero in town named, well, he doesn't have a name. But he calls himself Murderbot. Technically Murderbot isn't a person, it's a construct--part robot, part lab-grown organic material. But in so many ways, he embodies all our are struggles. On one hand, he's got a strong moral code, the urge to protect and defend and epic hacking and smashing skills. On the other hand, more than anything else, he wants to find a dark space to sit and watch 'media.' I just finished book two of the Muderbot Diaries, Artificial Condition by Martha Wells and it held up to the high bar set by book one. Below are some thoughts on this second book and the series in general. Careful, there spoilers, so best to skip this post if you haven't read books one and two. And if that's the case what are you waiting for? Go read them, they're short, smart and fun.

[Spoilers ahead!]

I'm fond of saying that what really makes a book a win for me is when I learn something. Learning in this context can mean almost anything. Consider the body tweaks Murderbot decides to have Art perform on him. When he makes special note of the data port in the back of his head, I assumed he meant he was going to have Art remove it. Murderbot explains that some humans have data ports, but most don't. If he's going to blend in with people, removing it would be the obvious choice.

During the climactic close combat scene we learn the details of how Murderbot had his data port 'taken care of.' He didn't have it removed, instead, he had it internally disconnected.

This was a genius move. To anyone who figured out Murderbot's identity, they'd assume that the data port was his kryptonite. Slap a combat override module in the port and you're good to go. That's precisely what the baddies do, of coures. And it doesn't go well for them because the port is dead.

My lesson: think twice before you hide a perceived weakness. It may be possible to turn that weakness into a strength by leaving it in plain sight and letting other's assumptions work to your advantage.

This strategy reminds me of the tactics employed by physical security tester Jason E. Street. He describes showing up at sites he wishes to breach in a wheelchair with boxes on his lap. Who's going to be the jerk who doesn't get the door for him?

Zooming out from combat tactics, I really like how Wells tackles the thorny ethical issues that go with the topics of AI, lab-grown human parts and smarter-than-human machines. On their surface, the universe the Murderbot occupies is fairly striaightforward. There are humans, augmented humans, bots and constructs. Humans, including the augmented variety, have rights, non-humans don't. There's plenty of action and humor to occupy the reader, so they need not question this social structure.

But, look a little deeper and you see things get more complex. Consider the makeup of each type of being. Humans are completely organic, augemented humans are a mix of organic and machine, bots are fully machine and constructs are again a mix of organic and machine. In this context, why should constructs be denied rights when they are built from the same materials as an augmented human? Is there that much difference from having organic material grown in a womb than a lab?

Wells uses our hero, Murderbot, to drive this point home. Not only does he look and act human, but he finds joy in relishing his freedom. When a human asks him to complete a task, it's the ability to say no that helps awaken the Murderbot to his full potential.

Finally, on a completely unrelated note, I can't help but wonder what those in the Autistic community think of Wells' Murderbot. It's quite possible my naive understanding of the Autism spectrum has me connecting unrelated dots, so you'll have to forgive me if this is a reach.

It seems that Murderbot has many mannerisms that would be associated with those on the spectrum. He's a brilliant tactician and combat specialist, and yet he's uncomfortable with even the most basic social interactions. He regularly opts for a 3rd person video view of a scene, rather than looking people in the eye. During a number of interactions, he and Art teamed up to perform sophisticated real time analysis to understand simple body language cues and mannerism, the type that a 5 year old would have no problem processing. And finally, in the closing scene in Artificial Condition Murerbot treat a request for a hug the same way I'd treat a request for a root canal. Did Wells intentionally model Murerbot after those with Autism?

Is Murderbot a hero the in the Autistic community? An insult? Or, a figure that's no more connected to them than I am to James Bond. From a bit of research, it appears that I'm on to something. There's also this bit of explanation from Martha Wells herself:

Question: As a mental health professional, I can't help but notice that, were he a human, Murderbot would likely be considered to be on the autistic spectrum. Was that a conscious choice or more of a coincidence? If it was an intentional decision to have Murderbot and autism overlap, what did you study to better represent neurodiversity on the page?

Answer: Those aspects of the character were based on my own experience. I'm not neurotypical, and I've been affected by depression and anxiety all my life.

That's a lot of insight and questions from a novella. If nothing else, take that as a sign of how good the Artificial Condition is.

Wednesday, January 13, 2021

A Windows Friendly Solution to the Video Packaging Problem

A Windows Version, Please

A friend wanted to use my ffmpeg video packaging script. But there was a catch: he needed it to run on Windows. As a bash script, it runs seamlessly on Linux and MacOS, Windows not so mch.

The immediate solutions that came to mind weren't very helpful. I could re-write the script to be cloud based, but that would be terrifically inefficient in terms of both my time and complexity. I could have have my friend install a Unix environment on his Windows computer, but that seemed overkill for one script.

I could re-write my script in PHP and have my buddy install XAMPP. But again, that felt like swatting a fly with a sledge hammer.

The exercise I was going through was a familiar one. As a programmer, I'd been given an issue and I was making my way through the 5 stages of grief. Denial: nobody can expect me to make a Windows version of this script. Anger: why can't Windows be Linux! Bargaining: OK, you can have this script, but only if you turn your Windows box into a Linux box. Depression: ugh, Windows. And finally, acceptance: OK, so how would one do this on Windows?

Let's Do This!

I had an idea: I'd previously experimented PowerShell. And by experimented, I mean I launched the program, was excited to see it did tab completion and then quickly tired of using it. I'm sure it was step up from the standard DOS box, but it felt far inferior to the bash environment Cygwin provided. Still, PowerShell was a shell, so may be it had a scripting language I could use?

Finding sample PowerShell scripts was easy. At first I was overwhelmed: PowerShell was considerably more verbose than bash. But the ingredients for shell scripting were all there. After cursing Microsoft, it looked like PowerShell may be just the solution I was looking for.

Fast forward a couple of days, and I now have a version of my video packaging script that runs on Windows; no massive install of support tools required. Grab it here. You can run it by right mouse clicking on package.ps1 selecting Run with PowerShell. You can also launch the script within PowerShell using command line arguments. For example:

> .\package.ps1 -Source c:\Users\ben\Downloads\bigvid.mp4 `
                   -Config c:\Users\ben\Documents\blog\video-settings.ini

The Case for PowerShell

Here's a number of features of PowerShell that have left me more than a little impressed.

PowerShell let's me trivially launch a file picker, so that I can allow users to select the video and configuration file in a graphical way. It's also easy to confirm the files are valid and kick up a graphical alert box and if this isn't the case. In other words, PowerShell lets me do Windowsy things easily.

# Let users pick a file
function Prompt-File {
  param($Title, $Filter)
  
  $FileBrowser = New-Object System.Windows.Forms.OpenFileDialog -Property @{
    InitialDirectory = [Environment]::GetFolderPath('MyDocuments')
    Title = $Title
    Filter = $Filter
  }
  $null = $FileBrowser.ShowDialog()

  Return $FileBrowser.FileName
}

# Prompt for the video and config files
$Source = Prompt-File -Title  "Choose Video" -Filter 'MP4 (*.mp4)|*.mp4|QuickTime (*.mov)|*.mov|AVI (*.avi)|*.avi'
$Config = Prompt-File -Title  "Choose Settings File" -Filter 'INI File (*.ini)|*.ini|Text File (*.txt)|*.txt'

PowerShell doesn't natively support parsing ini files, but writing the code to do so was straightforward. I was able to adapt code on the web such that reading an ini file took in an existing set of values.

$settings = @{}
$settings = Parse-IniFile -File $PSScriptRoot\defaults.ini -Init $settings
$settings = Parse-IniFile -File $Config -Init $settings

Here I'm setting the variable $settings to an empty hashtable. I'm then filling the hashtable with the value of defaults.ini and then overriding these values with the user selected config file. This is similar to the variable overriding I did in the Unix version of the script, though arguably it's cleaner.

I was able to move my custom code to separate files in lib directory, thereby keeping the main script readable.

I'm impressed how PowerShell natively handles named parameters. Not only can I define functions with named parameters, but I was able to have the script itself trivially take in optional parameters. At the top of package.ps1, I have:

param($Source, $Config, $SkipFcsGeneration)

I then check to see if -Source or -Config was passed in. If either are missing, Prompt-File is invoked.

if(-not $Source -Or (-not $(Test-Path $Source))) {
  $Source = Prompt-File -Title  "Choose Video" -Filter 'MP4 (*.mp4)|*.mp4|QuickTime (*.mov)|*.mov|AVI (*.avi)|*.avi'
}

if(-not $Config -Or (-not $(Test-Path $Config))) {
  $Config = Prompt-File -Title  "Choose Settings File" -Filter 'INI File (*.ini)|*.ini|Text File (*.txt)|*.txt'
}

These named parameters let me treat my script as a command line tool, and let's a typical Windows user think of it as graphical app.

I also improved the packaged video file itself. I added support for playing audio over the 'pre' title screen. The script uses ffprobe -show_streams to figure out the length of the audio clip and arranges for the title screen to be shown for this duration. PowerShell let me trivially kick off ffprobe and process its output, just like I would do in a bash environment.

Working with the audio stream forced me to understand how ffmpeg's complex filters worked when both video and audio streams are being manipulated. My Aha Moment came when I realized that you filter audio and video separately and that ffmpeg will piece them together. Essentially, I have one concat expression to join all the video streams and one to join the audio streams, and ffmpeg does the right thing to combine the audio and video at the end.

A Happy Ending

I finished this little project with not just a video packaging script that works on Windows, but with a fresh perspective on Windows scripting. What PowerShell lacks in tradition and terseness, it more than makes up for in capability and completeness. In short, PowerShell isn't an attempt to implement bash on Winows; it's a fresh and modern take on scripting that really delivers.

Check out my video packaging code over at github.

Wednesday, January 06, 2021

Seeing All The Pretty Colors: optimizing emacs + screen + Secure Shell Chrome App

The Secure Shell Chrome App combined with a remote Linux box, screen and emacs is a game-changer. Among other things, it turns my Chromebook into a programmer friendly hacking environment.

One quirk of this combination is that the color scheme emacs loaded by default was often illegible. I'd typically run M-x customize-themes to pick a better color scheme, but no matter the theme I selected the colors were always harsh and often left text hard to read.

Turns out, there's a quick fix to this issue. The problem and its fix is described here. It boils down to this: the Secure Shell App sets the terminal type to xterm-256color. Emacs supports this terminal type, granting it access to, well, 256 colors. But I'm running screen, and screen morphs that terminal type to screen.term-256color. Emacs doesn't know what to make of this terminal type so it falls back to to 8 color mode.

This becomes clear when I ran M-x list-colors-display.

The following tells emacs that screen's terminal type is one that it knows:

(add-to-list 'term-file-aliases
             '("screen.xterm-256color" . "xterm-256color"))

I added this code to my init.el, restarted and suddenly got access to 256 colors.

Now the default emacs color choices make sense. Such a simple fix, and I didn't even realize I had this problem.

Tuesday, January 05, 2021

hbo-blogger.el: A Simple Strategy for Editing Blogger posts in emacs

I'm writing this post in emacs. I know that may not seem like a big deal, but trust me, it's a big deal. See: here's a screenshot proving this:

My blog is hosted by Blogger, and with the exception of a bit of command line hacking, I've always edited my posts at blogger.com.

Every few years I look around for an emacs friendly Blogger solution but have never found a fit. That changed when I stumbled over oauth2.el. Using this library, I found that I could trivially make authenticated requests to the Blogger API. While interesting, it wasn't immediately obvious what I could use it for. On one hand, I knew I didn't want to build out a full Blogger emacs interface. On the other, it would be sweet if I could somehow leverage emacs for post editing. And thus, hbo-blogger.el was born.

The hbo in hbo-blogger stands for Half-Baked Opportunistic. In other words, this isn't some finely crafted Blogger emacs library. This is me taking every shortcut I can find to somehow mash emacs and Blogger together. As klugy as this sounds, I'm amazed at how well this all came together.

At it's core: hob-blogger offers two key functions:

  ;; Downloads the latest draft post and loads it into
  ;; an emacs buffer
  (hbo-blogger-edit-latest-draft-post "[your blog's URL]"))

  ;; Saves the current buffer, which is specially named with the
  ;; blog-id and post-id back to Blogger
  (hbo-blogger-save-buffer)

With thest two functions, I can seamlessly take a draft post I've started in Blogger, load it into emacs and continue editing it there. I can then use the hbo-blogger-save-buffer to save my writing back at blogger.com.

To glue this together, I've added a new interactive command to my init.el:

(defun blogbyben-edit-latest-draft-post ()
  (interactive)
  (hbo-blogger-edit-latest-draft-post "http://www.blogbyben.com"))

This allows me to type M-x blogbyben-edit-latest-draft-post and I'm off and running. When this function runs it adds hbo-blogger-save-buffer to the post's after-save-hook. The result: saving a post saves the file locally and pushes the content back to Blogger.

Most of this functionality came together with ease. One big catch: the PATCH functionality promised in the Blogger API only works on published posts. If you look at hbo-blogger.el you'll notice I had to fallback on the more clunky PUT call.

While functional, I can see a number of obvious improvements to this library. It should be trivial to add hbo-blogger-new-draft-post to create an empty draft post via emacs. I'm sure there's a menu library I could leverage to show a list of recent Blogger posts and let me choose one to edit from there. I wrote my code using url-retrieve-synchronously when I almost certainly should be using url-retrieve. Finally, I'm sure I'm committing many a sin with the way I'm loading up post buffers. The hard coded call to web-mode, for example, is almost certainly a no-no.

But even with these limitations, I just composed my first Blogger post in emacs and it was awesome! The whole process Just Worked.

You can grab the code for hbo-blogger.el over at github.com.